Love is Spoken Here Board

White painted board.  Use vinyl stencils and transfer paper to put the words of your choice on the board.  Paint with gray and red.  After it's completely dry, remove vinyl and sand it down if you desire a distressed look. 

Up close you can see how the sandpaper gave it an old, worn look.

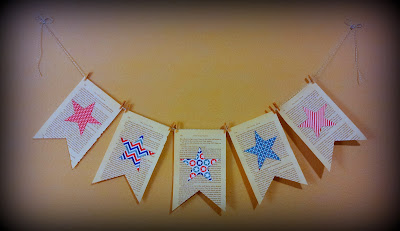
Book Page Banner

Easy and cute way to decorate for a holiday.  Get an old book and cut the pages out into a banner shape.  Using stencils, trace and cut out shapes on desired colored paper.  For some of these, I used a sponge and and ink pad to go around the paper edges for a softer look.  Attach to baker's twine with mini clothespins.  Hang and enjoy!


Painted FHE Assignement Chalk Board


Glass Etching

Here's an easy way to distinguish your pie plates or cake pans from someone else's when you attend a potluck or party.  Glass etching!


Sunburst Wreath

This wreath was actually really easy to make, and I love how it turned out.  I would've liked it to have more sticks to give it a fuller look, but I had to work with what I had!  Trace a circle template over cardboard and cut out with an Xacto knife or box cutter.  Hot glue the sticks onto the cardboard.  Rip strips of cotton fabric.  Twist, layer and glue them until you have rosettes.  Hot glue on top of the sticks .  Cut a length of burlap ribbon and hot glue on the back for the hanger.  Done!


Pumpkin Blocks

Cute idea from Christie over at Pops and Podge


Lollipop Bouquet

 I wanted to make something cute for Mike's birthday to drop off at his office, so what better place to search for ideas than Pinterest?  I found this idea from
 

And then I adapted it.
Mike just turned 31 so I decided to use the lollipops but I added an M&Ms hand held fan to the mix.  I printed a little sign on cardstock that read "If you think 30 sucks...just wait, you'll soon realize 31 blows."  My original idea was to use bubblegum for the "blows" part, but Vessel said, "why don't we get a little fan because it blows air?"  I thought that was pretty clever, so that's what I went with.  

I found the little box at Dollar Tree and, just my luck, I found a cube piece of styrofoam in the plant section that was the exact same size as the box.  So I stuffed the styrofoam into the box and arranged 30 Tootsie Pops like a bouquet.  Mike actually loves Tootsie Pops, so it made this idea even better.  I hot glued a craft stick to the cardstock sign I made and stuck it between the box and the styrofoam.  I tied the candy fan to the box with some helium balloons.  Done! 


Sign

 One of the Christmas gifts I made this year was a sign with a saying for my sister-in-law.  She said she wanted this particular saying in her house as a reminder.  I got the wood from a friend and it was already painted red.  So I made a mix of blue and painted a layer over top of the red.  Then I sanded it around the edges to let the red show through a bit and give it a distressed, worn look.  I used vinyl lettering and a vinyl bird decal and painted in the negative space and peeled the vinyl away before the paint dried.  I sprayed a couple of coats of protective sealant on the top to prevent peeling and scratching.  Then I gently pounded a metal hanger on the back with a hammer so she could hang the sign on a nail.  She said her favorite color is green, and I was planning to do some green, brown, and neutral colors in the beginning.  But then when I got this red painted wood I got a new vision of how it should look.  I hope she likes it! 


Misc. Turkey

For Vessel's homework assignment he had to make a turkey out of random things lying around the house.  I helped him construct this turkey out of beans, tissue paper, cardstock, red pipe cleaners, and some colored pencil.  He had fun gluing on the beans, smushing up the tissue paper into balls, and bending the pipe cleaners.  It could be a fun Thanksgiving project for kids to see what kind of stuff they could come up with to use. 


Service Auction

 For the Relief Society Service Auction I decided to make a few things to submit for people to bid on.  I made this harvest wreath with stuff around my house. 

I felt like it was missing something, so I made a little sign to go in the center that said, "Happy Fall!"

I also made 3 pairs of earrings with beads I had in my collection. 


Wooden Nativity

Last weekend I got to experience my first ever "Super Saturday," which is a day when all the ladies in my church get together and craft.  These next few posts will show the crafts that I chose to make.  I think they all turned out very cute!  


For this wooden Nativity we were given all the plain wood pieces and could paint them however we chose.  I was surprised to see how diverse the choices were among the others who did this craft with me.  Some chose bright colors, others chose neutral colors.  I stuck with the colors from the example on our table.  Yah, I didn't feel like being all unique I guess.  :)  First I sanded the wood pieces to smooth the surfaces and give the edges a more rounded feel.  Then I watered down some paint and applied a thin coat to each piece.  To add dimension I gave Mary a little more than just a solid blue coat of paint.  Then I sanded the pieces again to give them a worn, kind of distressed look.  After the paint on the star dried, I added a touch of Mod Podge and some gold glitter.  Then I glued the heads on the bodies and attached those to the base with hot glue.  I finished it off by tying some twine string around it.  Voila!  A simple looking Nativity to display at Christmas! 


Go to Pops and Podge to see more Super Saturday crafts we did last weekend. 


Ornaments


To make these ornaments just print out some Christmas or holiday sayings that you like on some scrapbooking paper.  Apply the sayings to thin pieces of wood with Mod Podge.  (For our craft day, everything was already prepared for us.  The wooden rectangles already had little holes punched in the top for the wire and there was a wide selection of holiday sayings on various colored paper to choose from at the table.)  Add a thin layer of Mod Podge to the surface.  You could apply glossy or matte finish Mod Podge depending on your preference.  Once dry, cut some wire to the desired length and push through the small holes at the top of the wood.  Add some bells and curl the ends of the wire with pliers or a pencil.  You can put them on your Christmas tree as ornaments or attach them to presents or food tins as gift tags!  I really liked making these because, again, there are so many ways to make them.  Paint them whatever color you want, sand them to give them a rustic look, or give them a shiny appearance with a Mod Podge finish.  Use black or brown wire, silver or rusty colored bells.  The choices are endless!

Tile Coasters

These coasters were the easiest of all the projects!  All I had to do was cut out some 4x4 pieces of scrapbooking paper I liked and Mod Podge them to the smooth, glossy surface of the white tiles.  Then I put another thin layer of Mod Podge over the top.  Once they were dry they were sprayed with a sealant.  For the last steps, I just glued some pieces of round felt to the bottom corners of each one and tied a ribbon around the coasters.  These are such an fun gift to make because the designs you can choose are practically endless!   


To see more Super Saturday projects, visit Pops and Podge. 

Jewelry Dish


This jewelry dish was made using a special kind of clay.  I'm not sure what it's called, but it comes in a clear plastic package and there are a thousand colors to choose from.  You roll it out and press a design into it.  This one was done using a doily.  But you could use stencils, typewriter key letters, whatever you want.  Place a bowl on top of the rolled out clay and cut around to make a circle.  Place the clay into the bowl or tin and gently push down to make a little dish.  With leftover clay you can make birds, hearts, flowers, or anything else you wish.  My friend was nice enough to make these birds for me!  Then put the dish in the oven according to the directions on the clay package.  This will bake the clay and make it hard.  Use it for storing rings, bracelets, or earrings. 

 For more Super Saturday projects go to Pops and Podge

Hooter Hider

My friend Lesa made me this "hooter hider" for baby #3 since my other one is now worn out from several washings. Some of you might remember this post. Well picking out the fabric was the same situation as the skirt. Lesa hated the fabric, but I LOVED it. I had to get it. I love contemporary things, but sometimes I am drawn to really old fashioned floral prints like this one.


Art by the Boy Child

I totally forgot to post this last year. During one of the lessons I was teaching for preschool we were learning about our bodies, so I let the children lay on long pieces of rolled paper and trace their bodies, then they got to fill in the details as they pleased. I got a kick out of Vessel's body that he drew. He told me there was earwax in one of the ears and check out that belly button, even though he was obviously wearing a shirt (as indicated by the letters he drew on his chest.) The whole thing just makes me laugh. It has been hanging in his room for several months now.


Sara's Jewelry

My friend Sara creates handmade and custom made jewelry and she gave me this little bracelet. I thought I'd just put in a plug for her business "Sweet n Sassy." Anyone in the Great Falls area interested in some jewelry email Sara at sweetnsassybysara@yahoo.com.

Apron

My cousin took all of grandma's dresses after she passed and made aprons for all the grand-daughters. So now I have a little piece of history. (I know the picture isn't that great, so my apologies.)

Necklace

This necklace was handmade by my sister-in-law Karen and was given to me for Christmas. I love it so much and wear it every single day!
18" sterling silver chain, champagne freshwater pearl, lead-free tierra-cast pewter heart charm, 2 sterling silver rectangle tags personalized with my boys' names, complete with sterling silver findings (head pins, jump rings, etc.)
Check out her Etsy shop by clicking the link above.


(Apologies for the color not being the best quality in this picture...)

Placemats

My friend Lesa made these adorable placemats for us for Christmas.

Green and Brown Purse

A gift for my mother-in-law for Christmas.


Front

Side

Inside

Bulletin Board

Since getting called as primary president in our ward, I've had to do 2 bulletin boards so far. This year I decided to play around with my new Cricut and, with the help of my counselors, we came up with this bulletin board idea. The theme for the year is "I Know the Scriptures Are True." The scripture for January talks about "feasting on the words of Christ" so that's kind of where we went with the idea. The little ants are feasting on the scriptures, rather than food! I guess the ants could represent the children.... Or something. :)
Anyway, it was a lot of fun to use my Cricut for this and look forward to other projects I can do with it.
(Letters, kite shape, sun, scriptures, and grass all done with Cricut Expressions machine. Everything else was drawn and cut out by hand.)

My First Time Making Pottery

This is my first attempt at making pottery. Not the kind you throw on a wheel. Just some handmade stuff I did at the C.M. Russel museum when I went with Jenny a couple of weeks ago.

I made this sushi plate and wrote "Oishi" on it, which means "yummy" in Japanese. But I accidentally added an extra "i" on the end of it making it "Oishii." I wonder if that is the equivalent of "Yummeeeeeeee!" :)


Here is the sushi plate, sake cup, and other dish I made. Not horrible for my first time, I guess. It was really fun to use my hands and mold the clay. There is something therapeutic and sensual about making pottery. :)

Big Bag

Well, well kiddies. I've been sewing a bit lately. My sewing pal Lesa found this cute purse pattern and wanted to know if I'd like to make one. Of course I did because it's just darn cute. So I started looking for fabric and was kind of looking at the stuff I tend to draw towards until I found this beautiful yellow and black design. I don't even really like yellow, but as soon as I saw this I HAD TO HAVE IT. So then I tried finding a second design to go with it and found these Kanji letters. Loving oriental stuff ever since moving to Japan, I had to have it too. I think the two fabrics go well together. The flower pattern could pass as Asian-y, right? Either way, I really love this bag. Lesa helped me a ton with this project. It is quite roomy, so I can use it as a purse, or even a diaper bag. Love it!

Front of bag with pocket

The sides have ties so you can cinch it up or let it out depending on the room you need. They also just make the bag super cute.

The inside of the bag has lots of pockets and lots of room to put all my junk.